


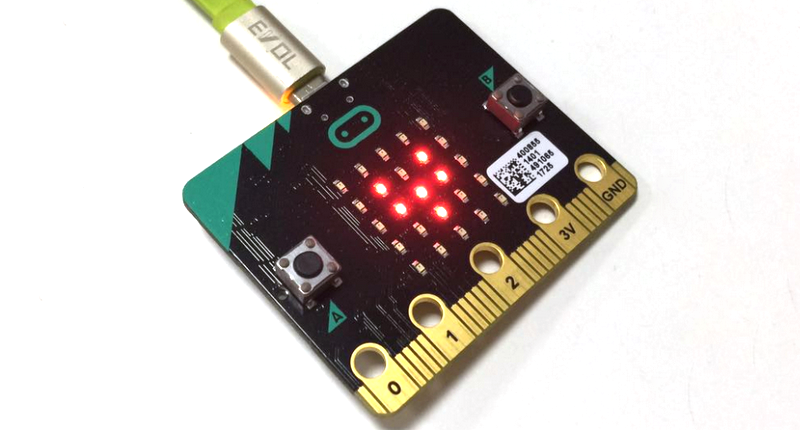
Robotbit is an excellent robotic expansion board specially designed (for Microbit, by KittenBot team) for primary school students/training institutions/parents/ enthusiasts as a robotic accessory.
Product Feature
It has a powerful ability to drive DC motors, stepper motors, servos, and onboard buzzer and RGB pixels and release all valid IO from microbit, with support the most common electronics module in the market.
It comes with 18650 battery holder, integrated lithium battery boost, charging and protection chip. Support for external power input. Mechnically support for KittenBot robotic chassis and LEGO technical slots.
The powerful drive capability and built-in battery make DIY more convenient and free. We have received unanimous praise from the school teacher training institutions and individual enthusiasts. It is an excellent choice for your robotic projects based on Micro:bit!
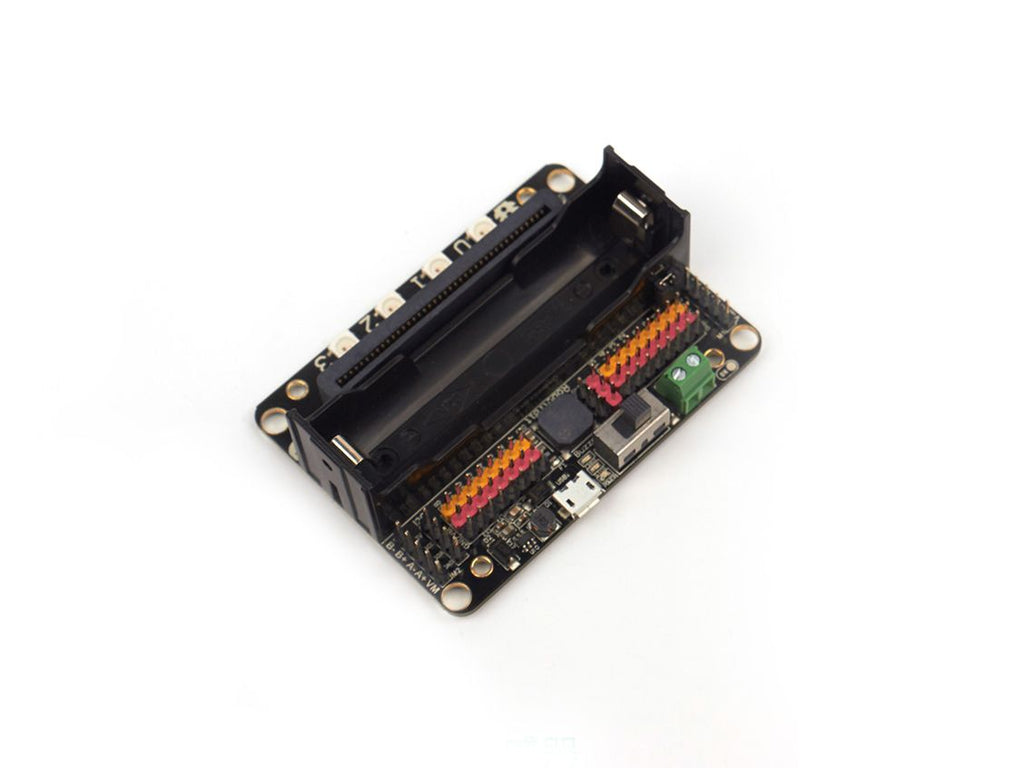
Hardware interface
1. 5V external power input(with anti-reverse protection)
2. Power switch
3. Power Indicator
4. Battery Indicator
5. Micro USB charing port
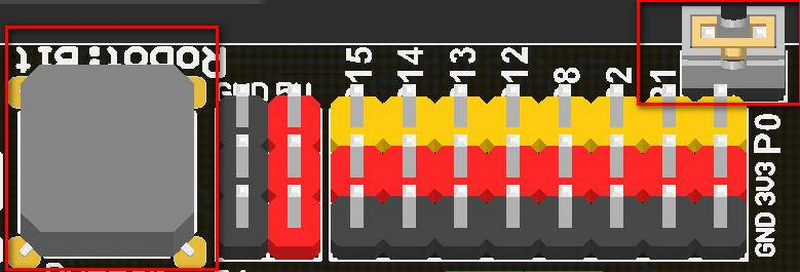
6. 4-channel DC motor / 2-channel stepper motor
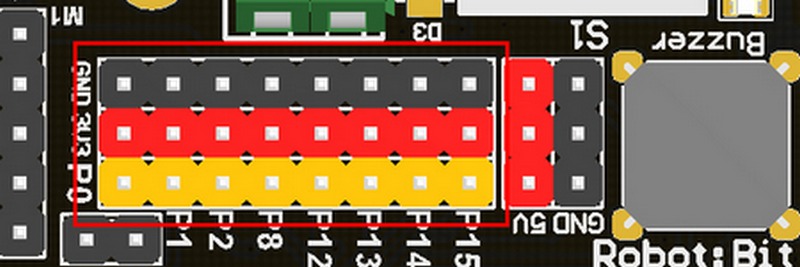
7. Jumper for buzzer selection
8. 8 channel IO(corresponding to Micro:bit P0-P2、P8、P12-P15)
9. 5V and GND port
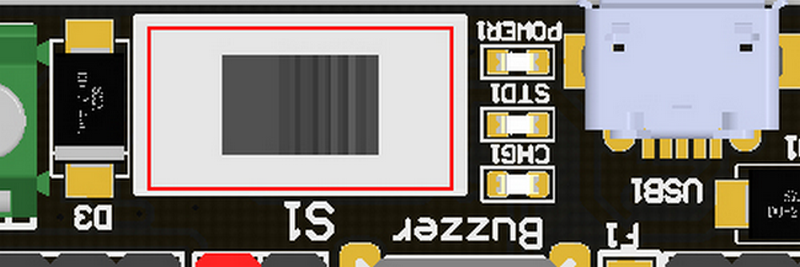
10. Buzzer
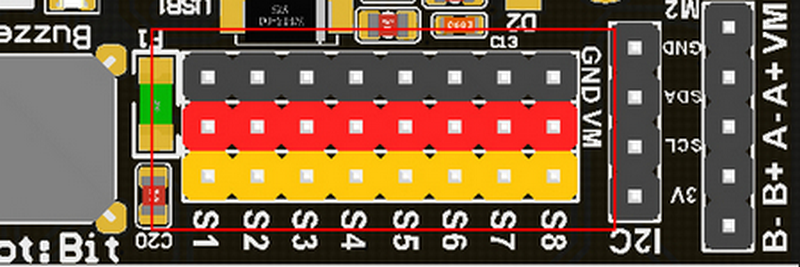
11. 8 channel servo port
12. I2C interface (expandable I2C module)
13. 18650 battery case
14. Bettery protection recovery push button
15. Micro:bit edge connector
16. 4x RGB pixel

17. Servo driver (PCA9685)
18. 2xDc/Stepper driver (DRV8833)
19. KittenBot robot chassis mounting hole
20. Standard LEGO hole

Supported software
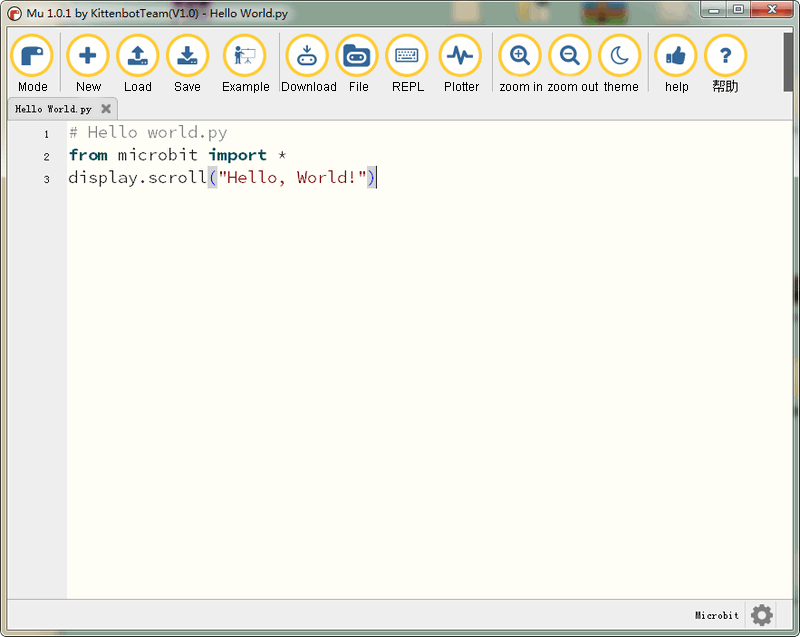
Available Coding platform: Kittenblock(based on Scratch3.0) or Makecode and python(Mu editor in microbit mode)
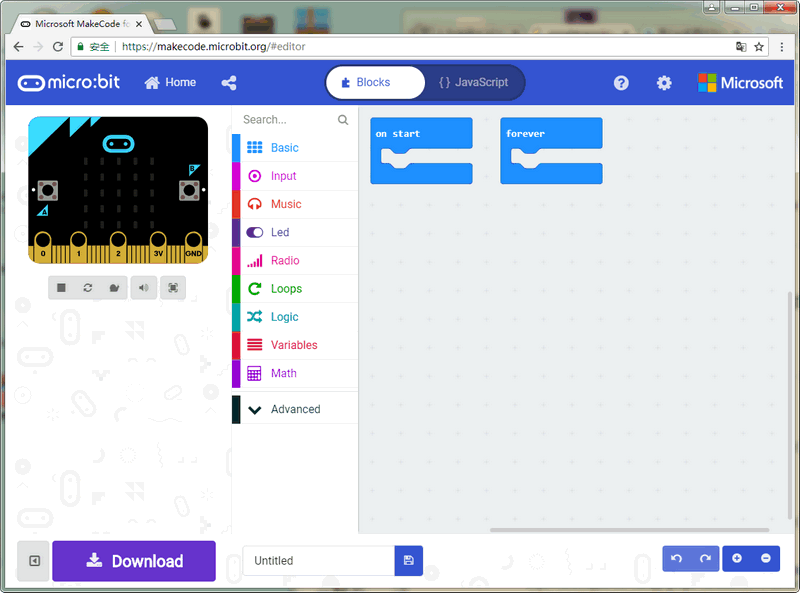
MakeCode from Microsoft
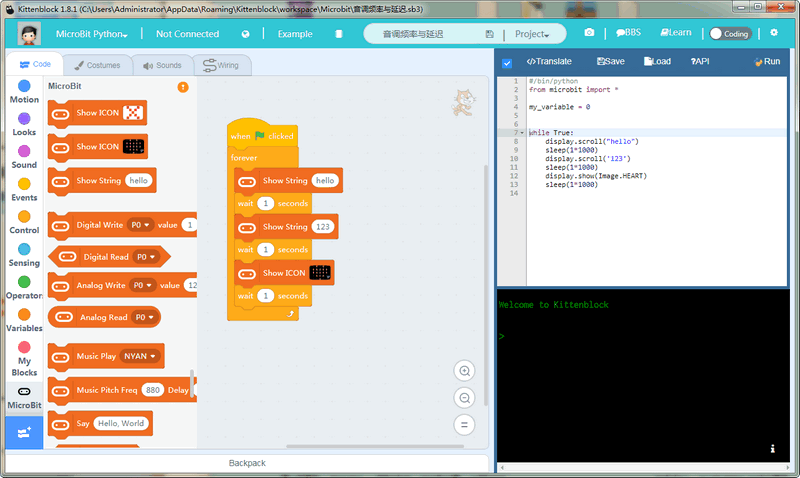
KittenBlock(Developed by Kittenbot Team based on Scratch 3.0)
Python
If you’re used to code programming and want to get started by microbit python you have two options, directly Mu Editoror kittenblock in micropython editor mode.
The above detailed tutorial can be found from our learn website for self-learning. If you encounter problems during the learning process, you are welcome to get us at our bbs or slack channel.
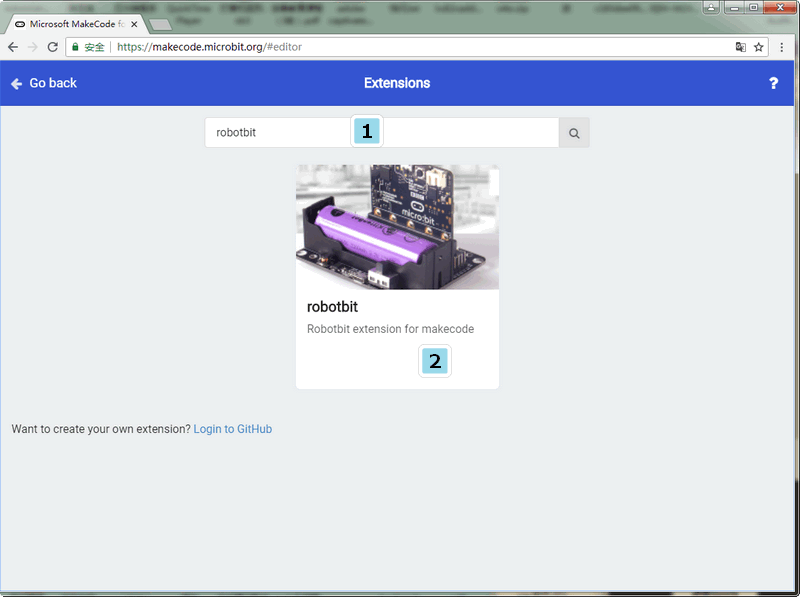
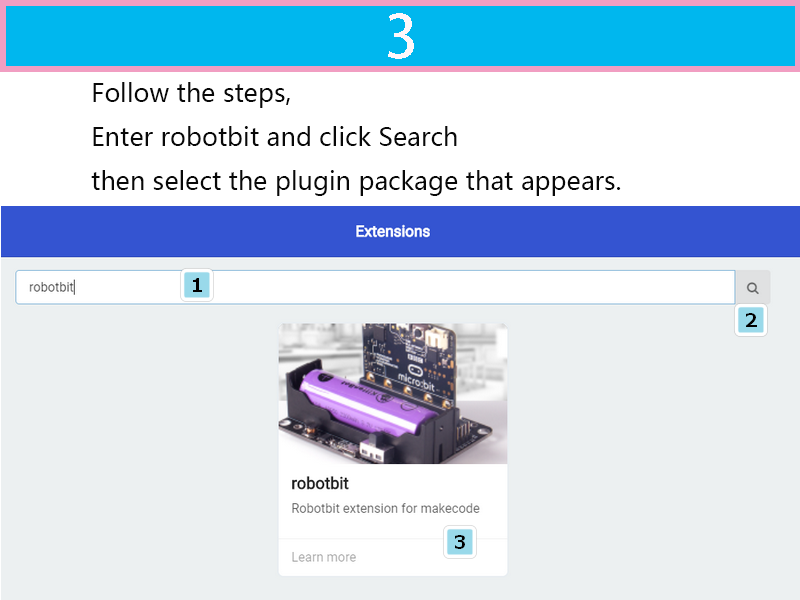
Makecode Extension
In makecode add extension panel directly search Robotbit. In our offline version of makecode, you may find Robotbit in the default list and other useful extensions.
Robotbit Detailed description
18650 battery case
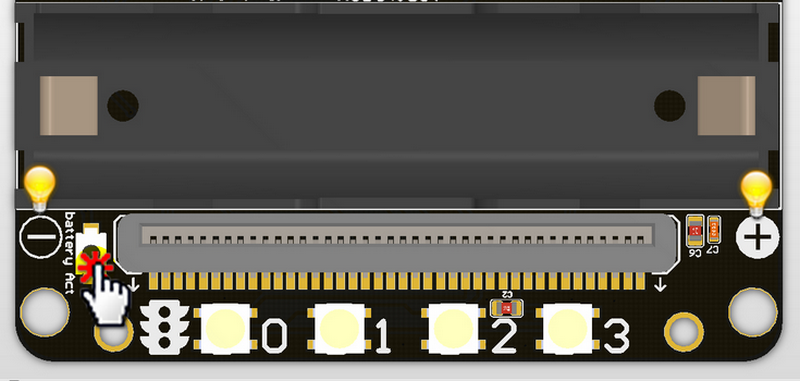
Once you got your RobotBit extension board please first install a 18650 battery, pay attention to the positive and negative pole (even we have anti-reverse protection). You have to activate the power management system by pressing the Battery Act push button. Each time you switch a battery cell or let the power management go into protection mode (over current or over discharge), you have to redo this step.
18650 Power switch
Turn on the switch (in the direction of green terminal input), will provide onboard 3.3V 5V and VM(motors and servos directly driver by battery cell)
Micro USB charger port

Only for charging and not for download! Computer USB host port or any other mobile phone charger which may output 1A or larger should be fine and may take about 2.5 hours to fully charge a 18650 cell. it will automatically cut off once full, no need to worry about overshoot.
Power and battery indicator
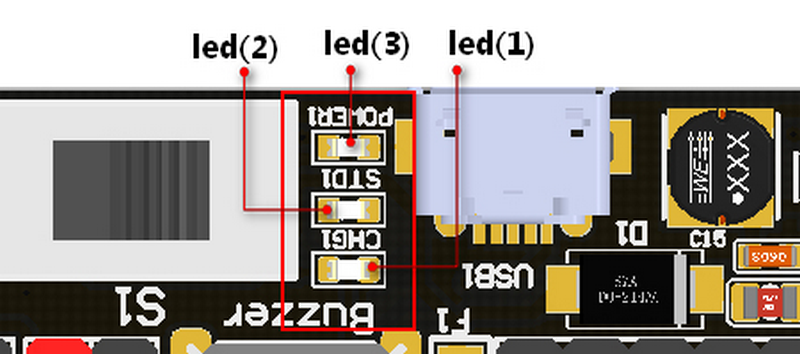
Led(3) is the power indicator, will be always on after switch is turned on. Led(1) is charging indicator, will be on while charing and Led(2) be on once fully charged.
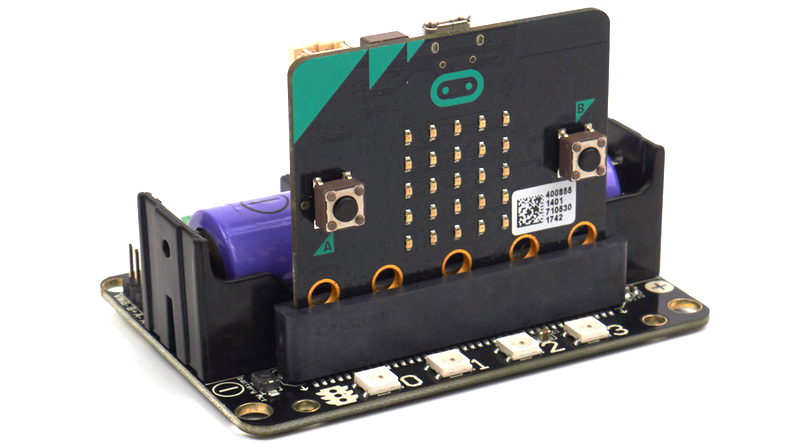
Micro:bit stand edge connector
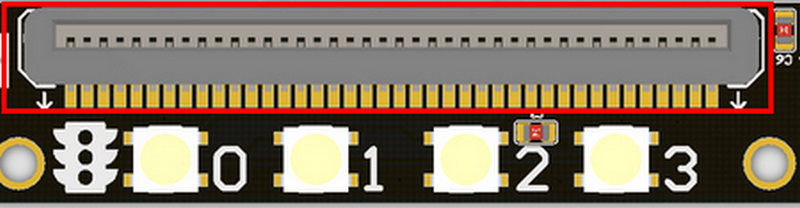
For installing Microbit mainboard. Please install Microbit with led matrix and RGB led in the same direction.
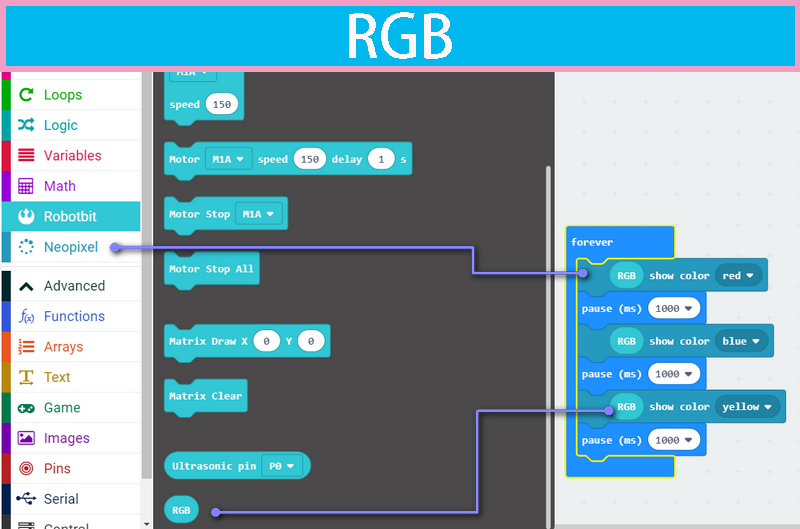
4x RGB neopixel
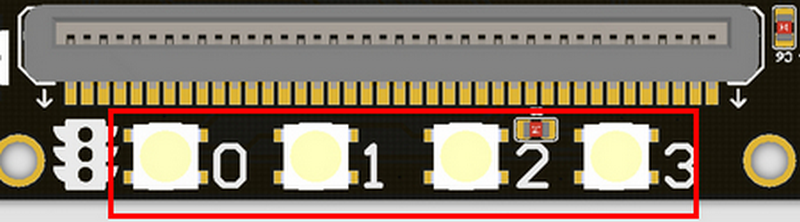
The robotbit extension for makecode has integrated neopixel support. Neopixel array connect to P16 of microbit.
8 channel servo connector
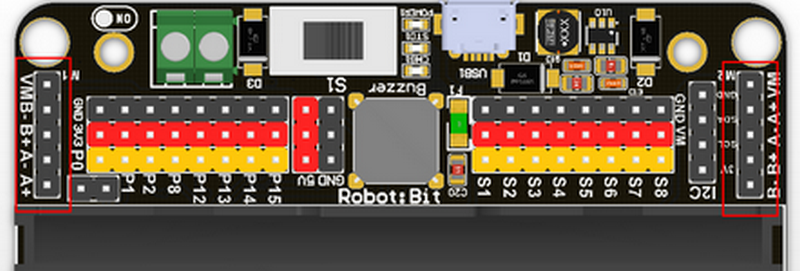
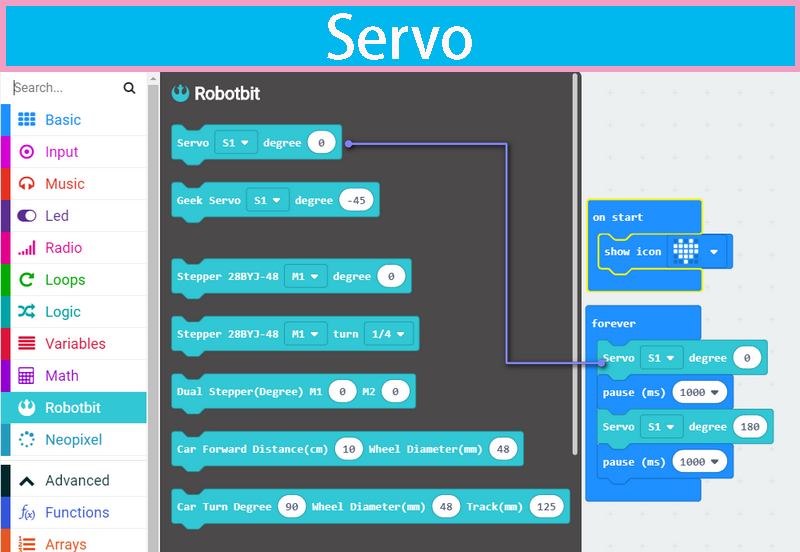
Servos are driven by an extension chip (PCA9685) with the power source from battery or external input.The extension chip communicates with Microbit via the i2c interface, so these S1~S8 interfaces can only be used for pulse output not as common IO. With onboard 18650 battery cell, it may drive eight 9g hobby servo (with maximum current less than 2A). If you plan to use larger servos like MG995 please use an external power resource connect to the green slot (the input still 5V). Robotbit extension has built-in blocks for controlling servos.
4 channel DC motors / 2 channel 28BYJ micro steppers
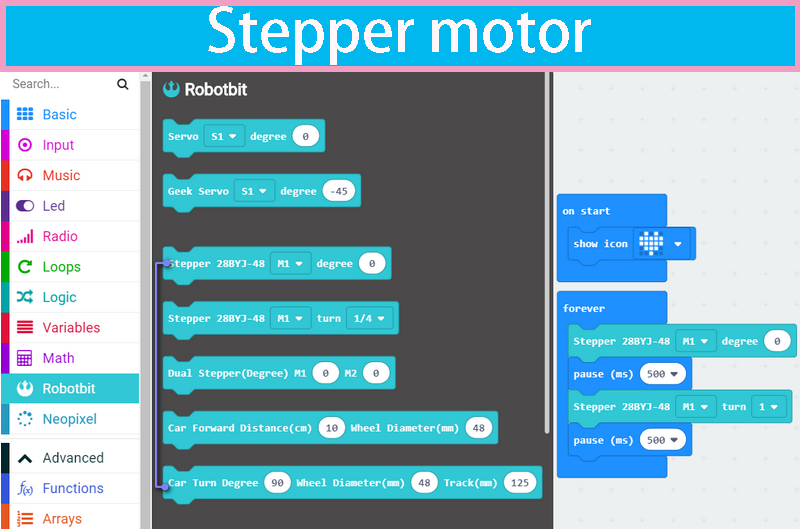
Robotbit extension has also built-in blocks for DC motors and steppers. With onboard cell you may drive 4x TT motors or 2x 28BYJ steppers, or a mixture of theese. Keep in mind that VM may out 2A to motors and servos. If you use external source please keep the input around 5V or less, a high voltage external input may damage the 5V boost circuit.
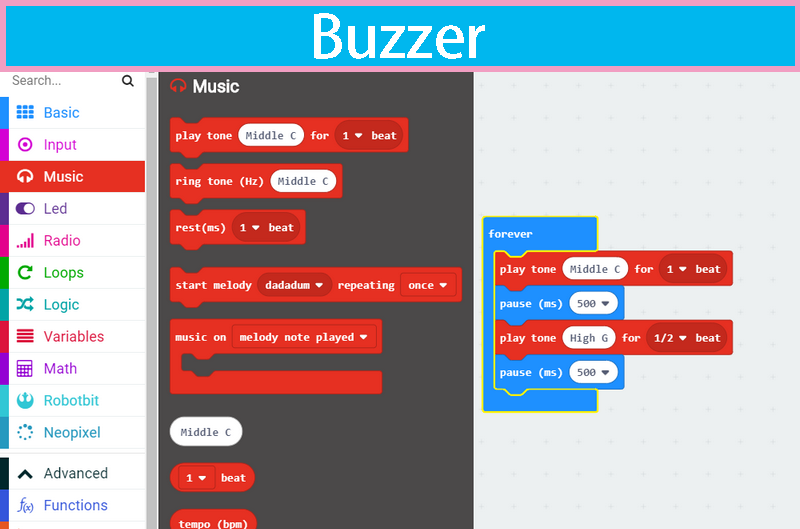
Buzzer and the selection jumper
The buzzer jumper cap is plugged in by default, and the corresponding buzzer is connected to the Micro:bit P0 port. If you need P0 for other purposes please unplug the jumper. The buzzer associate to music blocks in makecode.
Micro:bit IO
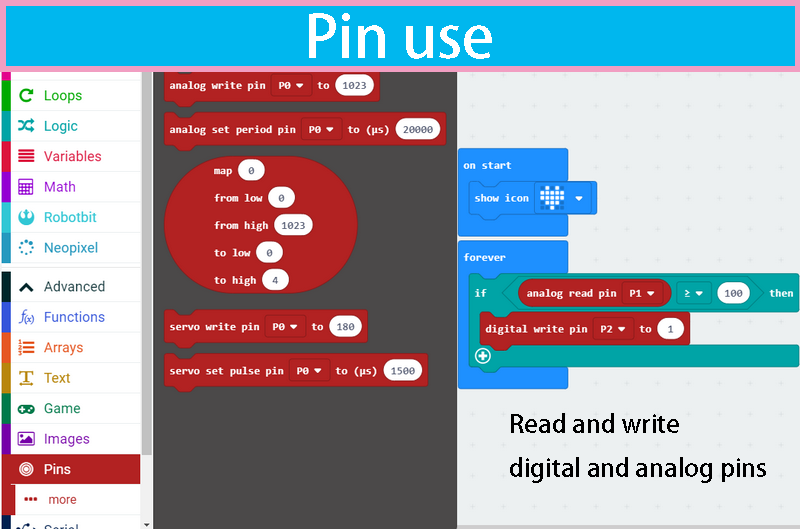
We have released P0-P2、P8、P12-P15 from Microbit to Robotbit for common IO usage. P0~P2 has analog read/write support, others may act as digital IOs. You may connect commonly modules for Arduino to Robotbit, there is also 5V output in case your module only support 5V power input. Please note that Microbit IO signal level is 3.3V.
I2C Interface
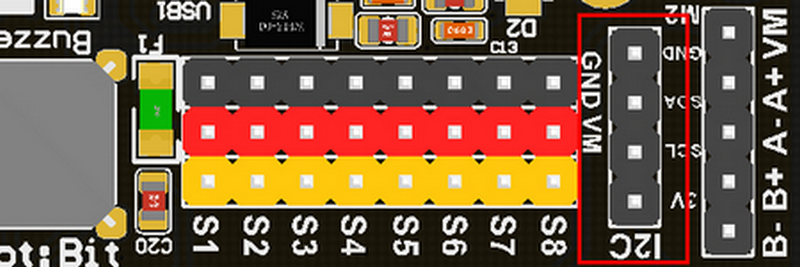
Expandable I2C module, can only be used to plug in I2C module.
2PIN External Power Input
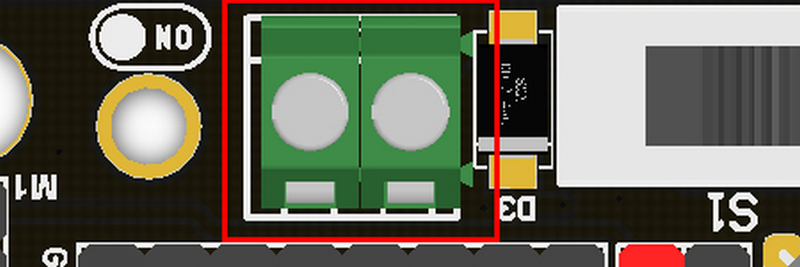
Although there is anti-reverse protection, but still pay attention while wiring. The positive and negative silkink of this interface is on the back of Robotbit. You can only input 5V or less into this port. If you have a higher voltage source you may need a LDO or DC-DC module to buck the voltage down.
Product Parameters
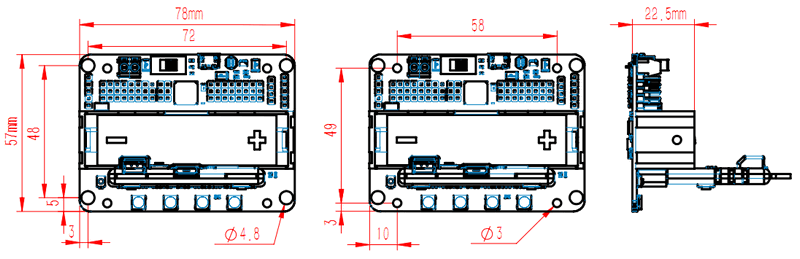
Dimensions: 78mm x 57mm x 23mm
PCB Thickness: 1.5mm
Small mechnical hole: 3.0mm
Big mechnical hole: 4.8mm
Net weight (without packaging): 37.5g
Functional parameters
18650 battery voltage: 3.7V
USB input voltage: 5V
VM pin max ouput: 1A (with onboard battery)
External Voltage Input (the green termial): 5V (only supports 5V input, do not connect over 5V, maximum current supports 3A)
Part List
RobotbitV2.0 x1
ECCN/HTS
| ECCN | EAR99 |
| HSCODE | 8517709000 |
| USHSCODE | 85177000 |
Robotbit Quick start
Put the 18650 battery on the Robotbit, pay attention to the positive and negative pole.
Plug the Microbit into the Robotbit and pay attention to the plugging direction.
Click the battery activation button
Turn on the 18650 battery switch
Open the makecode editor ( http://makecode.microbit.org ) and press add package.
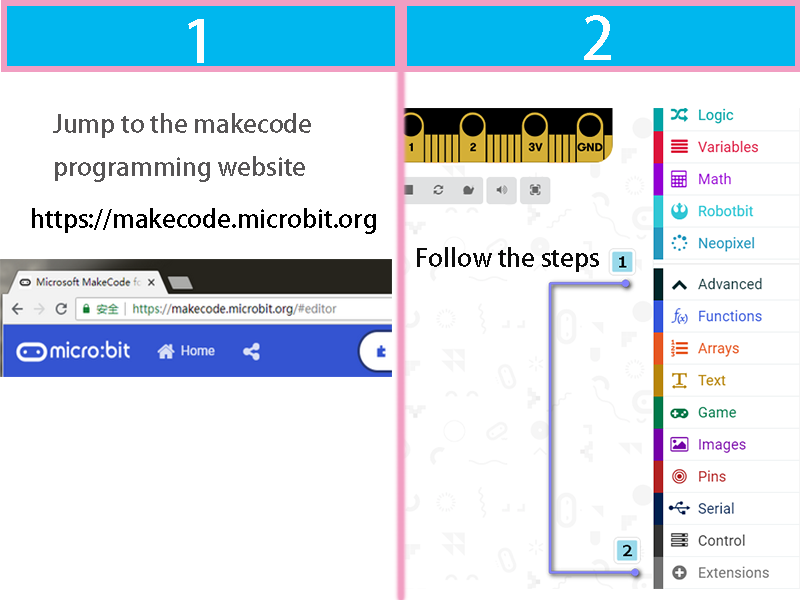
Search robotbit
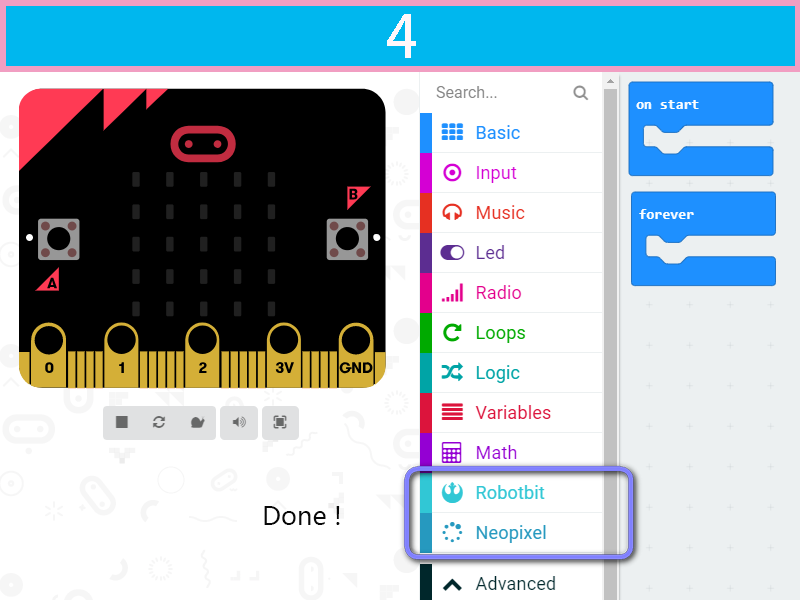
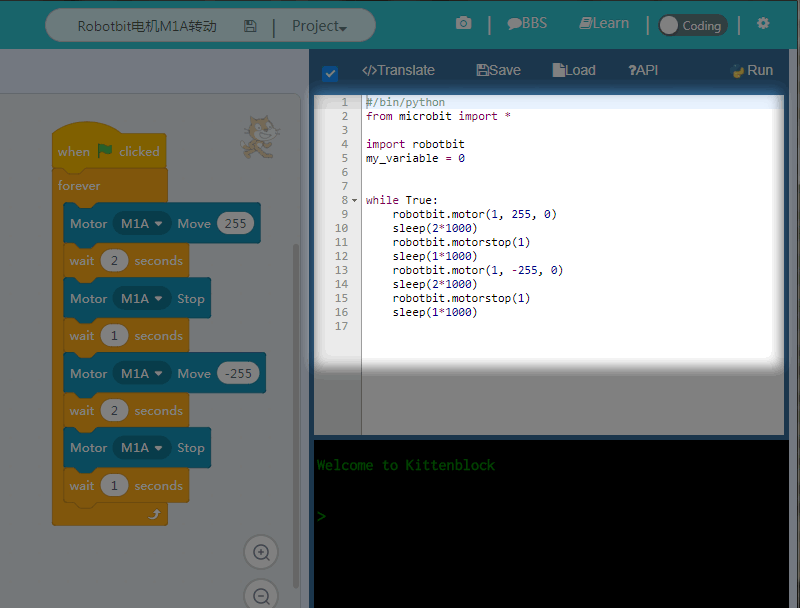
Drag some of the robotbit blocks out to workspace, remember to connect the corresponding motor servos, etc.

Before downloading, remember to connect to Microbit’s with a micro usb cable and click the download button.
After click download button, a file save box will prompt, please choose to save it to the Microbit removable disk.
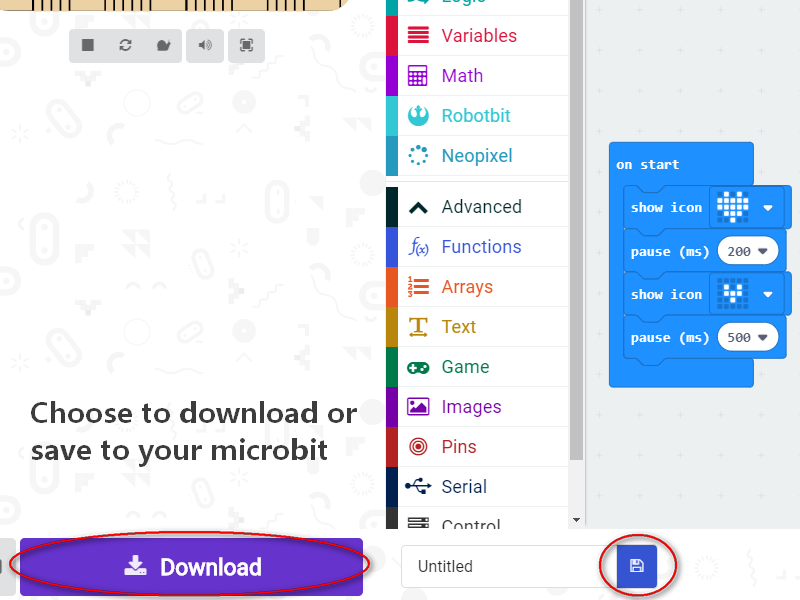
the final effect of the code block in the diagram above
F&Q
The battery is plugged in, there is no response after turn on switch?
Check if the battery activation button has been pressed? Check if the battery is positive or negative? Check if the battery has power?
What is the battery activation button used for?
In the case of overcurrent, or short circuit, or switch battery cell, the battery protection chip will protect the the circuit. Click the battery activation button to resume normal working mode.
Pluged in usb cable and I can’t find Microbit
The usb on the robotbit can only be used for charging. It can’t be used to download the program. It is plugged into the usb port of the robotbit. The computer will not respond.
Will it smoke if I insert battery inverse?
No, the robotbit design is anti-reverse protect in consideration of general miss operations. Inversely plug in will just not output power.
Will Microbit damage if plug in face back?
No, it will just refuse to work.
P0 pin control does not respond? Is it broken?
You need to unplug the buzzer selection jumper to use P0 as common IO.
Where is the rest of Microbit’s IOs?
Nearly 20 programmable IO ports on the Microbit, but many have been multiplexed with the dot matrix buttons on the board. Considering the inconvenience caused by multiplexing, beginners are likely to confuse on these. We have bridge 8 IO with no conflict to matrix or buttons to Robotbit, it should be enough for most diy projects. If you need all IO from microbit please choose IOBit from kittenbot team.
Can the servo interface act as common IO?
No, the servo s1-s8 is extended with a special servo drive chip and can only be used for servo drive.
What is the use of the VM on the motor interface?
The power source for 4-phase 5-wire stepper motor like 28BYJ. Usually, the VM is not used for the DC motor, and the DC motor only needs to connect A+A- or B+B-.
Can the board be placed on a metal surface or in a humid environment?
No, it will be short-circuited, pay attention to insulation
What is the voltage input for the green external power supply? What will happens with a higher voltage input?
Can only be connected to 5V, above 5V will damage the board, the current is recommended 2~3A, which means that the maximum current supported by the board is 3A
I did follow the tutorial, not results
If the test results are not corresponding, first check your wiring and procedures, some small place in general is missing, please double check.
Shipping rates Australia wide and New Zealand
FAQ:
- How do I estimate shipping for my order?
- Add products in the shopping cart and head to the checkout page to estimate the shipping.
Dispatch time
Unless expressly agreed otherwise with you, we will not commence delivery of an order until we have received cleared payment of the purchase price in full.
All orders placed before 11 am AEST (Monday to Friday) will ordinarily be processed on the same day.
We will endeavour to ship the Products by the applicable time indicated on the website, but all times are indicative only. All shipping times are dispatch times only, and actual delivery dates will depend on the shipping method chosen, delivery address and delivery service provider.
Note- Please make a note during purchase if you require any item urgently. However we cannot guarantee that we will be able to comply with any request.
*Go to Australia post delivery time calculation to get various Australia post service in your area please use our shipping postcode Thomastown, 3074 as the "from" address - https://auspost.com.au/parcels-mail/delivery-times.html?ilink=tools-open-deliv-times.
We ship all products throughout mainland Australia, Tasmania and New Zealand - Including Darwin, Melbourne, Sydney, Tasmania, Adelaide, Brisbane, Perth, all metro and regional areas but do not deliver to areas in Australia where the Australia Post delivery network is not available.
Check Express shipping delivery coverage area at - http://auspost.com.au/parcels-mail/delivery-areas.html
Receipt of deliveries
Deliveries to post office boxes are not permitted where delivery is by courier. If delivery is by courier and nobody is available at the delivery address to accept delivery when delivery is attempted then the courier may either:
- leave the relevant parcel at the unattended address (the courier will do so if specified in your delivery requirements); or
- re-attempt delivery at a later time or date, in which case we may charge you an additional re-delivery fee.
Note that if a delivery is left unattended at the shipping address and is subsequently stolen then the theft is your responsibility, not ours.
Payment & Security
Your payment information is processed securely. We do not store credit card details nor have access to your credit card information.